centos+v2ray+nginx科学上网教程

安装nginx

1
2
3
4
5
6
7
yum install -y lrzsz vim git make tar gcc openssl-devel pcre-devel zlib-devel 
wget http://nginx.org/download/nginx-1.19.1.tar.gz
tar zvxf nginx-1.19.1.tar.gz
cd nginx-1.19.1
./configure --prefix=/usr/local/nginx --with-http_stub_status_module --with-http_ssl_module --with-stream
make && make install
ln -s /usr/local/nginx/sbin/nginx /usr/bin/nginx

安装v2ray

1
bash <(curl -L https://raw.githubusercontent.com/v2fly/fhs-install-v2ray/master/install-release.sh)

编辑/usr/local/etc/v2ray/config.json.

其中id参数可由客户端生成,也可用网上其他方式生成,只要服务端和客户端保持一致即可。

1
2
3
4
5
6
7
8
9
10
11
12
13
14
15
16
17
18
19
20
21
22
23
24
25
26
27
28
29
30
31
32
33
34
35
36
37
38
{
"log" : {
"access": "/var/log/v2ray/access.log",
"error": "/var/log/v2ray/error.log",
"loglevel": "warning"
},
"inbound": {
"port": 39127,
"listen": "127.0.0.1",
"protocol": "vmess",
"settings": {
"clients": [
{
"id": "x-x-x-x-x",
"level": 1,
"alterId": 64
}
]
},
"streamSettings":{
"network": "ws",
"wsSettings": {
"path": "/abc"
}
}
},
"outbound": {
"protocol": "freedom",
"settings": {}
},
"outboundDetour": [
{
"protocol": "blackhole",
"settings": {},
"tag": "blocked"
}
]
}

编写nginx配置文件/usr/local/nginx/conf/v2ray.conf

1
2
3
4
5
6
7
8
9
10
11
12
13
14
15
16
17
18
19
20
21
22
23
24
25
26
server {
listen 80;
root /var/www/html/;
index index.html index.htm;
server_name www.xxx.com;
rewrite ^(.*)$ https://$host$1 permanent;
}
server {
listen 443 ssl;
root /var/www/html/;
index index.html index.htm;
server_name www.xxx.com;
ssl_certificate /etc/letsencrypt/live/www.xxx.com/fullchain.pem;
ssl_certificate_key /etc/letsencrypt/live/www.xxx.com/privkey.pem;
ssl_protocols TLSv1.2;
ssl_ciphers ECDHE-RSA-AES128-GCM-SHA256:ECDHE:ECDH:AES:HIGH:!NULL:!aNULL:!MD5:!ADH:!RC4:!DH:!DHE;
location /PLMOKN {
proxy_redirect off;
proxy_pass http://127.0.0.1:39127;
proxy_http_version 1.1;
proxy_set_header Upgrade $http_upgrade;
proxy_set_header Connection "upgrade";
proxy_set_header Host $http_host;
access_log off;
}
}

在/usr/local/nginx/conf/nginx.conf中include进来v2ray.conf

1
2
3
4
http {
include mime.types;
include v2ray.conf;
...

安装ssl证书

安装之前确认nginx服务是关闭的,并且防火墙开放80/443:

1
2
3
4
5
6
7
[root@racknerd-82d3de certauto]# systemctl status firewalld.service
[root@racknerd-82d3de certauto]# firewall-cmd --zone=public --add-port=80/tcp --permanent
success
[root@racknerd-82d3de certauto]# firewall-cmd --zone=public --add-port=443/tcp --permanent
success
[root@racknerd-82d3de certauto]# firewall-cmd --reload
success

安装Certbot

1
2
3
4
5
6
yum install epel-release -y
yum install snapd
systemctl enable --now snapd.socket
ln -s /var/lib/snapd/snap /snap
snap install --classic certbot
ln -s /snap/bin/certbot /usr/bin/certbot

执行certbot安装证书命令

1
2
3
4
5
6
ln -s /usr/local/nginx/conf/* /etc/nginx/ (采取手动编译安装nginx的需要这一步,因为certbot默认校验/etc/nginx下的配置文件)
certbot certonly --email xxx@xxx.com -d www.xxx.com 邮箱和域名填写自己的

2 Spin 启动临时服务器
Y (Y)es/(N)o
Y (Y)es/(N)o

安装成功后显示证书文件地址,确保与v2ray.conf中的一致。

启动nginx和v2ray

1
2
3
nginx
systemctl enable v2ray
systemctl start v2ray

客户端配置

客户端下载:

https://github.com/2dust/v2rayN/releases

客户端配置:

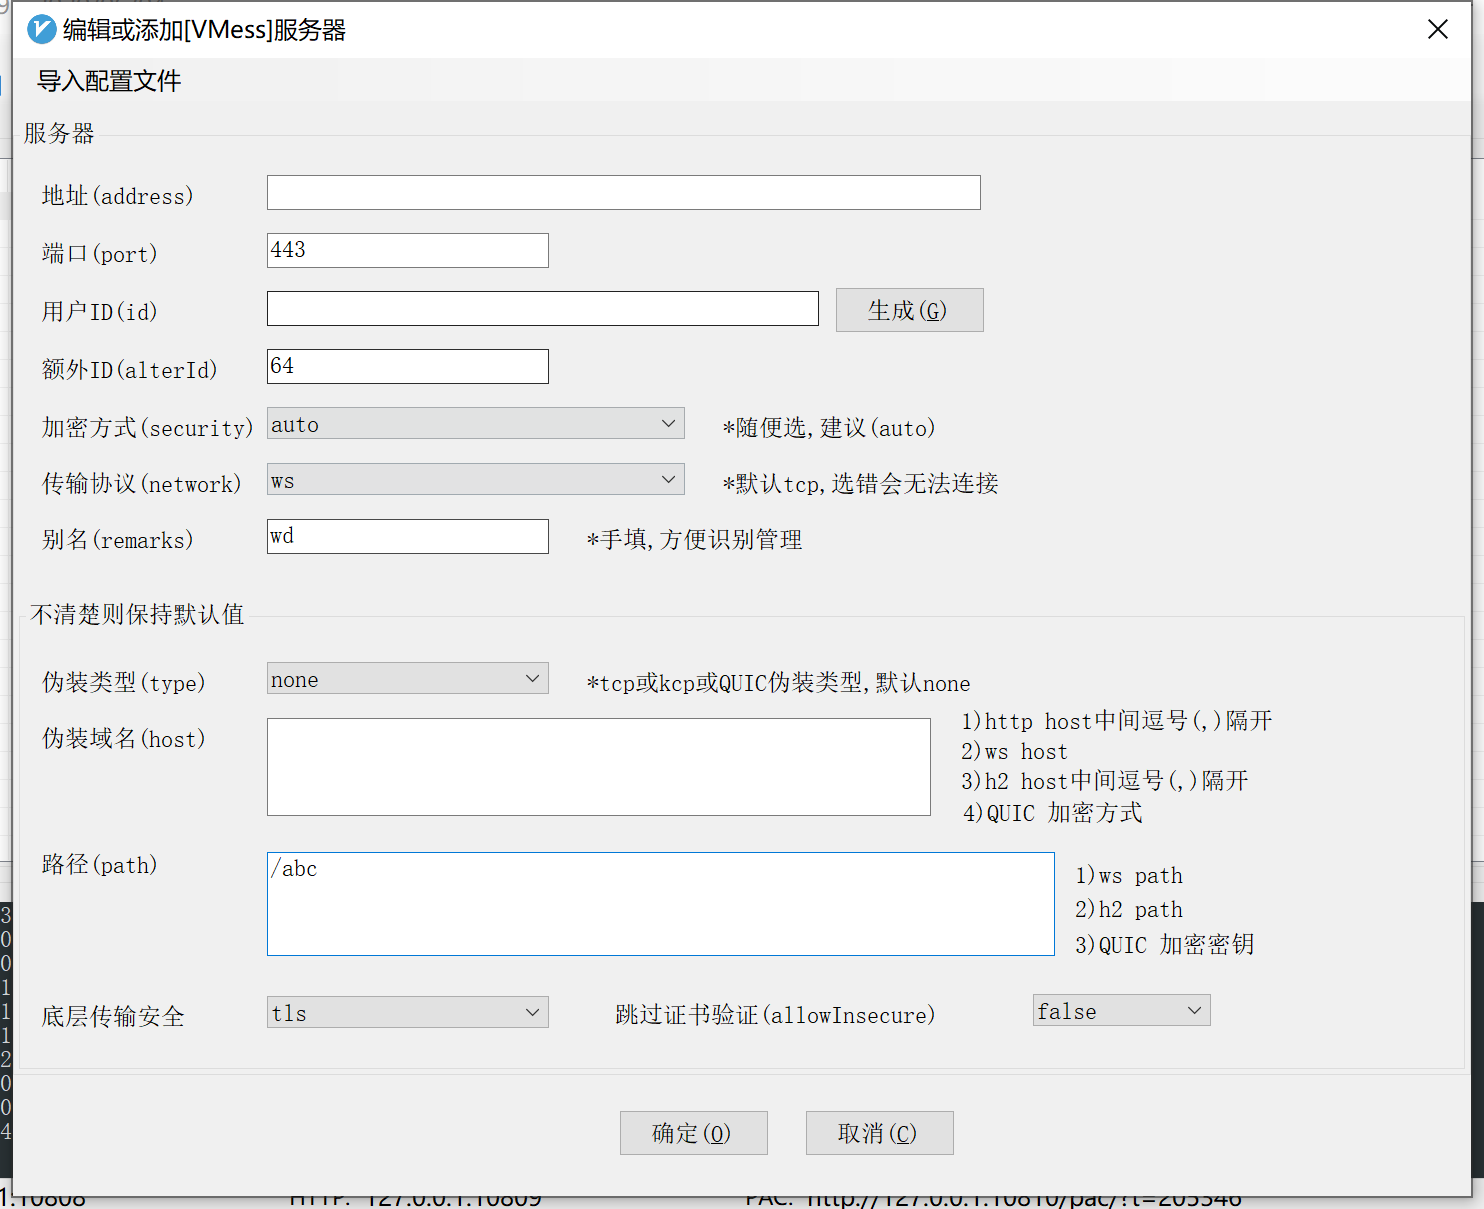
选择,服务器->添加VMess服务器。地址填写域名、用户id可以自动生成,并将id填写到/usr/local/etc/v2ray/config.json文件id参数处、额外id填64、传输协议选ws、路径填/abc,与v2ray.conf文件中location处参数一致即可、其他的可照图片配置。点确定后即可自动启动。如果配置都没问题即可在信息处看到访问记录信息。

image

参考链接